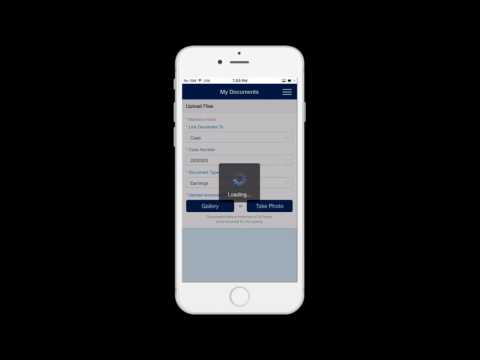
How to upload documents in See For Yourself mobile app. You can upload document images from your device's photo gallery or you can take a photo of a document to upload to an app or case that is linked to your See For Yourself account. It will take at least 24 hours before the county receives the documents you upload through the mobile app. From the home screen, click on "My Documents" and it will take you to the My Documents screen where you can upload the document images. In the "Link to Document" field, select either app or case from the drop-down list. If you have only one app or case, then the IAKH number or case number will automatically appear in the number field. If you have more than one, select your app number or case number from the drop-down list. Next, in the "Document Type" field, select the type of document that you plan to upload from the drop-down list. The "Gallery" and "Take Photo" buttons will turn dark blue, indicating that they are enabled and ready for you to select where you'll get your document photo. Select "Gallery" to upload a photo that you have already taken and saved on your device. If you haven't given permission to the See For Yourself app to access your photos, then you'll receive a pop-up message asking if you want to allow access. Click "OK" to continue. You will only be able to select and upload one photo at a time. The photo will appear in the preview screen. You can click "Cancel" at the top left corner of the screen to select a different photo. Once you have selected the photo that you want to upload, click "OK" at the top right corner of the screen and the...
Award-winning PDF software


Sar 7 2025 Form: What You Should Know
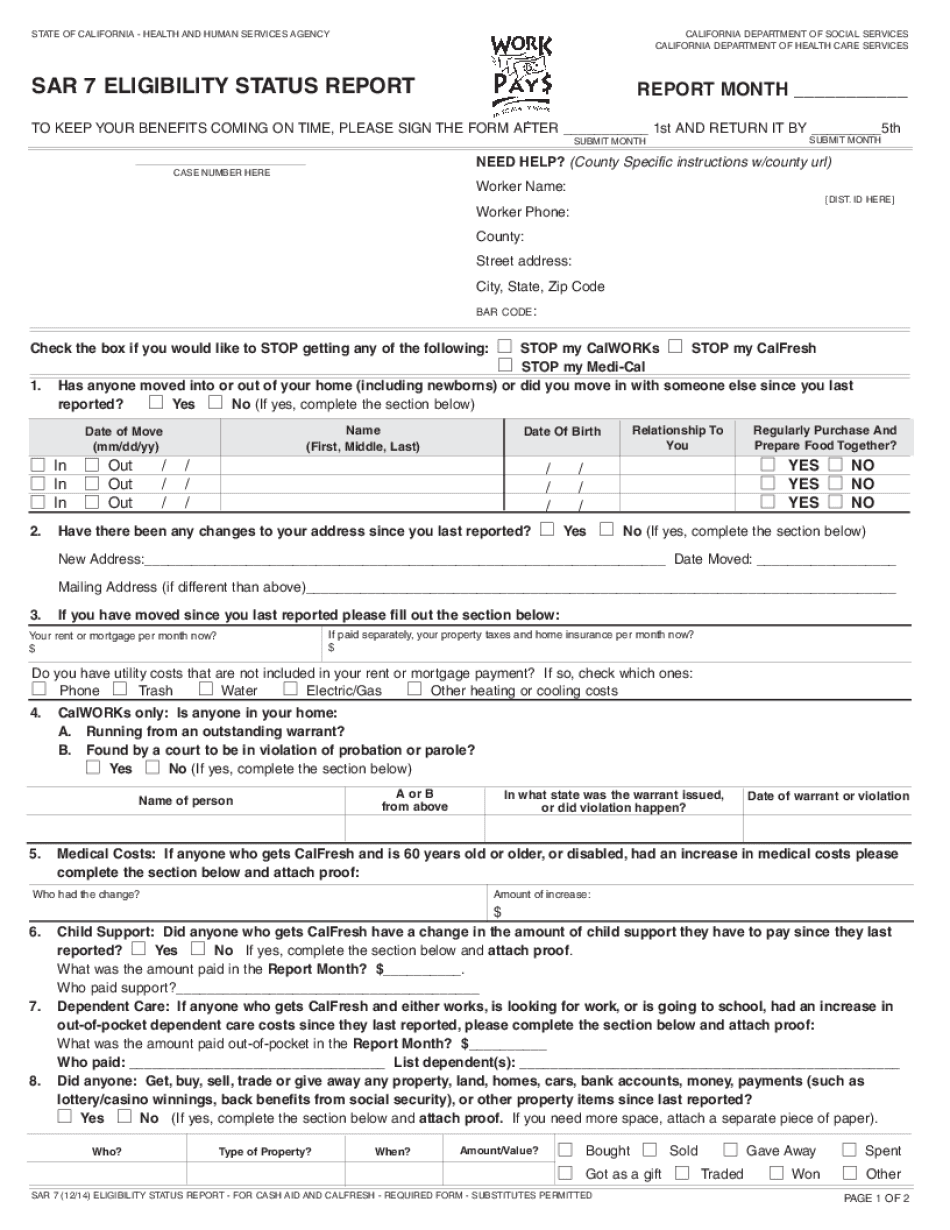
To view SAR 7 Benefit Program forms, click on the button below to access this system's online information system. The information in this website is provided for information only and, while all information in this website is publically available on request, the state of California makes no warranties as to the accuracy, completeness or reliability of any information contained on this website. The information on this website is for general education and information purposes only. As such, a prospective recipient should seek advice and consultation with the proper personnel or agency. Any information contained within this website does not constitute legal advice. In no event shall the California Department of Health Services (CDS) be responsible for a personal, consequential, indirect, special, punitive, direct, or pecuniary loss incurred as a result of the user's reliance on the data contained on this website. This website is a public forum, provided to the public for informational purpose. You agree that your non-infringing use of this website is encouraged, and that the state may be granted the right to limit, suspend, withdraw or modify the online materials and to revoke or terminate any commercial or personal access to the materials. In any circumstance where materials are removed from this website, the user is not required to provide a refund for the materials that remain on this site. SAR 1 This is an eligibility verification form. It is used to verify your eligibility for California's Supplemental Nutrition Assistance Program (food stamps, aka food stamp) and the Additional Assistance program (cash assistance). To take advantage of the free copy of this form, click HERE. (you can save the file to your computer, to print onto paper, or for use online). The information on this form is for the purpose of informing the Department about whether the individual (Applicant) is eligible to receive assistance for which an agency made an inquiry and to permit the agency to issue a receipt that permits the individual to withdraw cash assistance from the agency. To request a non-English form, please complete and submit this form.
online solutions help you to manage your record administration along with raise the efficiency of the workflows. Stick to the fast guide to do Form Sar 7, steer clear of blunders along with furnish it in a timely manner:
How to complete any Form Sar 7 Online: - On the site with all the document, click on Begin immediately along with complete for the editor.
- Use your indications to submit established track record areas.
- Add your own info and speak to data.
- Make sure that you enter correct details and numbers throughout suitable areas.
- Very carefully confirm the content of the form as well as grammar along with punctuational.
- Navigate to Support area when you have questions or perhaps handle our assistance team.
- Place an electronic digital unique in your Form Sar 7 by using Sign Device.
- After the form is fully gone, media Completed.
- Deliver the particular prepared document by way of electronic mail or facsimile, art print it out or perhaps reduce the gadget.
PDF editor permits you to help make changes to your Form Sar 7 from the internet connected gadget, personalize it based on your requirements, indicator this in electronic format and also disperse differently.
Video instructions and help with filling out and completing Sar 7 Form 2025